A couple weeks ago a good friend of mine had a baby. At home. In her bathtub. On purpose.
She's been a bit AWOL from life since and I finally talked to her a little yesterday via text message and she agreed to let me take her dinner and hold her sweet baby boy.
While I was fixing the meal for her and her husband tonight I realized that whenever I want to help someone, I show up with food. I use food for everything.
I'm not the best at telling people I love them, but I can make them cookies. I'm not really good at helping people with their lives, but I can and will make them dinner. It just seems to be the way that I feel I can fit in and help the best.
Food is so good for so many reasons. Love, therapy, a helping hand, a night off for someone. I'm really learning to love cooking and being in my kitchen - even if I have some helpers with grubby hands every once in a while.
I guess food is good therapy for me, too.
A blog about feeding your family real food, cooked at home that's fast and easy and oh so yummy.
Friday, July 30, 2010
Saturday, July 17, 2010
Tin Foil Dinners
Last week I went camping with a youth group. Just an overnight-er. When I found out that for dinner, we'd be consuming tin foil dinners, I was ecstatic. I LOVE THIS! I thought.
Awesome.
That was, until, I saw them. The person in charge had cooked all the ingridients SEPARATELY the night before. Then they were combined, wrapped in foil, stuffed into a cooler, and had buckets of ice dumped over the top.
When they were taken out of the cooler to be "warmed up" on the hot coals they were dripping with watter and soggy.
And, the ground beef was chopped up and crumbled on top like a condiment.
ick.
ick.
double ick.
I left camp to "run an errand" and stopped at the local McDonald's for dinner instead.
Since then however, I've felt the need to consume such a feast in foil. The other day with my trusty three year old assistant chef, we set out to make the best and most seasoned (thanks to the helper) tin foil dinners on the planet.
our ingredients:
ground beef
onions
green onions
Yukon gold potatoes
red bell pepper
every single salt and seasoning we could pull out of the pantry in one armful.
We cut and sliced and molded. We sprayed the foil, gently laid out our ingredients and went out to the grill.
no gas.
in the grill.
The husband never turned the switches to "off" after our last BBQ event. He also never turns the propane off (no righty tighty in his book).
Thank heavens the house didn't burn down.
That left me with 2 beautiful packets of food and no BBQ.
We headed back indoors, my assistant and I and put our dinners in the oven at 400 degrees for nearly an hour.
They could have used another 20 minutes.
I had to zap them in the microwave for a bit but the final result?
Absolutely scrumptious.
I love tin foil dinners....even if my effort were
well
nearly......
foiled!
Monday, July 12, 2010
Food Party Favors
My cousin is getting married in one month. On Saturday, my aunt threw a bridal shower for her soon to be daughter-in-law. I volunteered to help with a few things, one of which was the party favors.
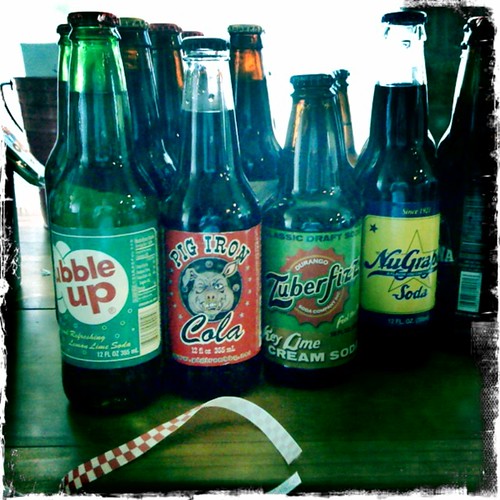
The shower had a kitchen/grocery theme so I knew that the favor needed to be food oriented. When my original idea didn't quite pan out, while wandering around cost plus world market I found these great old fashioned sodas and was inspired to use them for the shower favor.

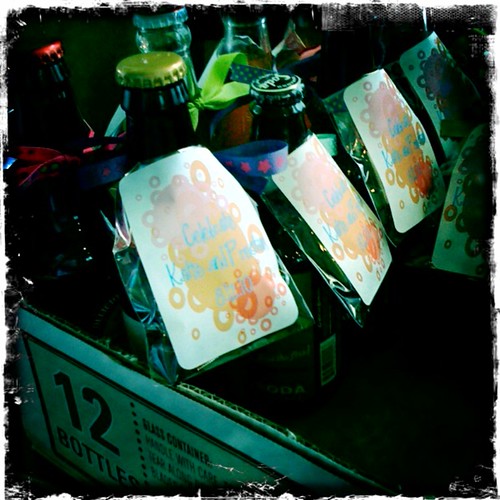
Not being too crafty or creative, I didn't think until later about making a cute label to cover the soda label or anything like that. I did whip up a festive sticker to put over the yummy chocolates that I attached with a ribbon. That was about as creative as I got.

The sodas however were a hit - and I seemed to manage to get a flavor to fit everyone's taste (black cherry, grape, orange, chocolate, cola, key lime, lemon lime and root beer).
It's always fun to do a project - especially one that involves a little bit of sugary goodness.
The shower had a kitchen/grocery theme so I knew that the favor needed to be food oriented. When my original idea didn't quite pan out, while wandering around cost plus world market I found these great old fashioned sodas and was inspired to use them for the shower favor.

Not being too crafty or creative, I didn't think until later about making a cute label to cover the soda label or anything like that. I did whip up a festive sticker to put over the yummy chocolates that I attached with a ribbon. That was about as creative as I got.

The sodas however were a hit - and I seemed to manage to get a flavor to fit everyone's taste (black cherry, grape, orange, chocolate, cola, key lime, lemon lime and root beer).
It's always fun to do a project - especially one that involves a little bit of sugary goodness.
Thursday, July 8, 2010
Do you want fries with that?
Last night was one of those nights - a little too much fried food for my stomach, but everything still tasted good going down.
The main dish for dinner last night was chicken fingers. Home made chicken fingers are honestly better than anything in a restaurant, when made well anyway. I've invented my own methods, but last night's were some of the best I've ever made.

I start with frozen chicken tenders - thawed out of course. Thaw out as many as you need but in our house with two grown-up eaters and 1 pint size eater, we usually need 6-8 tenders.
Once they are thawed and your ready to bread them, pat all the chicken pieces with a paper towel to dry them out.
Next, soak them for 2-4 minutes in buttermilk. Yes, buttermilk! Regular milk works fine, but buttermilk is so thick that it's the best. If I use regular milk, I usually end up breading twice, but with buttermilk I only had to do it once.
While the chicken is soaking in buttermilk, get your flower dredge going. I use regular flour but I happen to have some self-rising flower so I used that last night. It was good. I'll use it again. In the flour I add my seasoning: salt, pepper, garlic salt, chili powder, something I've got called "fiesta" seasoning and anything else that sounds good. GENEROUSLY add the flavor to your flower.
Once the dredge is mixed, the rest is simple. Take the chicken out of the buttermilk and coat it with the flour. Work in batches of 3-4 at a time so that the flour doesn't get all goopy on the chicken. Once you've got 4 done, add them to the oil.
I use regular vegetable oil in a very hot skillet. You don't need a lot of oil - you don't want to submerge the chicken. Just enough oil to brown it one side at a time.
That's it. Maybe one day I'll try some beer battering like most restaurants do, but until then, these are a crowd pleaser every time.
The main dish for dinner last night was chicken fingers. Home made chicken fingers are honestly better than anything in a restaurant, when made well anyway. I've invented my own methods, but last night's were some of the best I've ever made.

I start with frozen chicken tenders - thawed out of course. Thaw out as many as you need but in our house with two grown-up eaters and 1 pint size eater, we usually need 6-8 tenders.
Once they are thawed and your ready to bread them, pat all the chicken pieces with a paper towel to dry them out.
Next, soak them for 2-4 minutes in buttermilk. Yes, buttermilk! Regular milk works fine, but buttermilk is so thick that it's the best. If I use regular milk, I usually end up breading twice, but with buttermilk I only had to do it once.
While the chicken is soaking in buttermilk, get your flower dredge going. I use regular flour but I happen to have some self-rising flower so I used that last night. It was good. I'll use it again. In the flour I add my seasoning: salt, pepper, garlic salt, chili powder, something I've got called "fiesta" seasoning and anything else that sounds good. GENEROUSLY add the flavor to your flower.
Once the dredge is mixed, the rest is simple. Take the chicken out of the buttermilk and coat it with the flour. Work in batches of 3-4 at a time so that the flour doesn't get all goopy on the chicken. Once you've got 4 done, add them to the oil.
I use regular vegetable oil in a very hot skillet. You don't need a lot of oil - you don't want to submerge the chicken. Just enough oil to brown it one side at a time.
That's it. Maybe one day I'll try some beer battering like most restaurants do, but until then, these are a crowd pleaser every time.
Friday, July 2, 2010
Chocolate Ganache
I'm an absolute chocoholic. I actually really do each chocolate every single day. The darker the better, but any chocolate will do on most days.
One of my best chocolate loves is ganache. It's easy to make, decadent to indulge in, and pretty versatile, too. And, you can use it for a lot more than truffles.

I've used ganache to "frost' a cake. I love doing this because when it hardens it's so shiny and smooth. All you do is drizzle it over the cake after it's cooled for a bit. It will take a few layers (and I'm not a professional so it never looks that great even though it tastes divine) to cover an entire cake.
I've also whipped it up and used it as icing. That way, it's like a chocolate mousse - really light and airy on top of a cupcake or cake. This is great because then the cake can be absolutely rich without the icing being too heavy, too. Once the ganache has cooled at room temperature for a couple of hours, or sped up in the fridge for about 30 minutes start whipping, just as you would for whipped cream from scratch. It will take some time so be prepared to stand with your electric mixer (I prefer a hand held mixer to my kitchenaide for this.).

So, how do you make a chocolate ganache? It's so simply.
You need equal parts heavy cream (whipping cream) and chocolate (16 oz cream and 16 oz chocolate). For ganache, like a chocolate mousse, you don't want to use a semi-sweet and definitely not a milk chocolate. The consistency of the chocolate just isn't right. You need a bittersweet or even a dark chocolate to make it all work out well.
Go ahead and whip some up today.
One of my best chocolate loves is ganache. It's easy to make, decadent to indulge in, and pretty versatile, too. And, you can use it for a lot more than truffles.

I've used ganache to "frost' a cake. I love doing this because when it hardens it's so shiny and smooth. All you do is drizzle it over the cake after it's cooled for a bit. It will take a few layers (and I'm not a professional so it never looks that great even though it tastes divine) to cover an entire cake.
I've also whipped it up and used it as icing. That way, it's like a chocolate mousse - really light and airy on top of a cupcake or cake. This is great because then the cake can be absolutely rich without the icing being too heavy, too. Once the ganache has cooled at room temperature for a couple of hours, or sped up in the fridge for about 30 minutes start whipping, just as you would for whipped cream from scratch. It will take some time so be prepared to stand with your electric mixer (I prefer a hand held mixer to my kitchenaide for this.).

So, how do you make a chocolate ganache? It's so simply.
You need equal parts heavy cream (whipping cream) and chocolate (16 oz cream and 16 oz chocolate). For ganache, like a chocolate mousse, you don't want to use a semi-sweet and definitely not a milk chocolate. The consistency of the chocolate just isn't right. You need a bittersweet or even a dark chocolate to make it all work out well.
Go ahead and whip some up today.
Subscribe to:
Comments (Atom)
